
How to Invoice Clients as a Freelancer
Reading Time: 5 minutesThe right freelancer invoice can mean the difference between ‘payment pending’ and ‘payment received.’
As a freelancer, getting paid is less streamlined than receiving a regular paycheck if you were a full-time employee. Typically, freelancers must send an invoice to their clients to get paid. This is because freelancers operate more similarly to a service-based business than an employee.
Although it may sound daunting, freelance invoicing is extremely straightforward when equipped with the proper tools and information.
This article will discuss how to invoice clients as a freelancer, without using spreadsheets. We’ll start by breaking down the steps to sending a professional invoice before covering some tips to streamline your invoicing process.
Table of Contents
How to Invoice as a Freelancer
It’s time to get paid! Here are the steps you can take to send invoices to collect payments from clients.
1. Invest in an Invoicing Platform
In the past, many contractors used freelance invoice templates to create their bills in Word or a similar tool.
This method was tedious because it required duplicating documents, downloading them as PDFs, emailing them as attachments, and keeping all the files neatly organized.
It was also a pain from the clients’ perspective because there was no integrated payment technology.
Fortunately, there are powerful invoicing tools that streamline this process. With an invoicing platform, you can create, send, and track your invoices in one seamless platform.
When you set up your profile in the invoicing platform, you can add your business information to an invoice template and save it for future use.
Many invoicing platforms also let you set custom-branded design elements and communication preferences to personalize the billing process.
2. Set Up a Client Profile
Most invoicing platforms allow you to set up profiles for new clients, enabling you to send and track their invoices easily.
This way, you can quickly send invoices while maintaining accurate client details every time.
Typically, when you set up a client account, you’ll need the name of a contact person, their email address, and the business’s address.
These contact details are vital because they ensure that your invoice reaches the correct person.
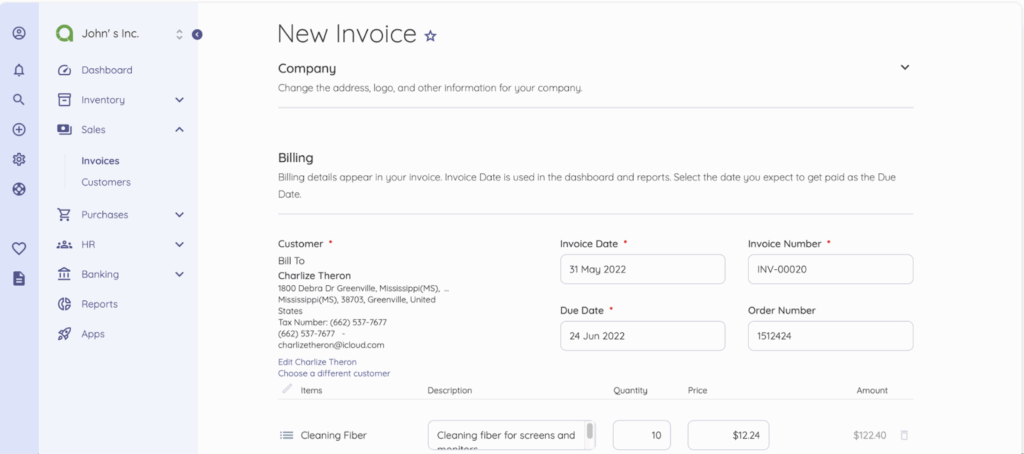
3. Add Your Charges
Now it’s time to add the charges for the billing cycle. Including an itemized list of charges can be helpful. This gives clients a detailed breakdown of their expenses for their financial records.
For each charge, add a name, description, and cost. Depending on the nature of your services, you may have to include units and quantities related to your charges.
For example, if you charge an hourly rate for consultation, you should indicate hours as a unit and the number of billable hours as the quantity.
If your invoicing tool doesn’t automatically calculate your charges, any applicable taxes, and fees, you’ll need to add them up so clients can easily see the total price they owe.
4. Add a Due Date
Next, you’ll add a due date for your contract. The due date of your invoice depends on what your contract states. For example, if you use standard payment terms like net 30 or net 45, your due date would be 30 or 45 days from the invoice date.
Some invoicing tools allow you to automatically charge a fee for past-due payments. If your chosen tool has this functionality, specify the fee for overdue payments.
5. Indicate How to Pay
You’ll also need to provide instructions on how to pay the invoice, including the available payment options. Some standard payment methods for freelance invoices include:
- – Credit card
- – Debit card
- – EFT/bank transfers
- – PayPal, Venmo, or Google Pay
- – Mailed checks
It is up to you to decide which payment methods to accept. For example, some freelancers accept credit card payments because they are a quick and easy transaction, but others don’t accept credit cards due to the hefty fees.
6. Double Check and Send
Once you’ve finished creating your invoice, review it carefully and then recheck it. Invoices are essential documents that represent your personal brand.
Mistakes happen, but it’s best to take the extra step to avoid them when possible.
After you’ve confirmed that all of the charges and other information are correct, you can send your invoice on its way.
Tips for Streamlining Invoicing as a Freelancer
Now that you know how to send an invoice for freelance work, let’s look at some of the top tips for optimizing your invoicing process.
Start at the Quote
Streamlining your invoicing process starts with sending a well-structured quote. This lets you get on the same page as your client and prevents confusion when it’s time to pay the bill.
Tools like quoting software can simplify creating professional estimates, converting them into invoices, and tracking everything in one place. This eliminates the need to manage a bunch of rogue documents, which is very useful if you’re working with multiple clients on multiple projects.
Add it to the Contract
One of freelancers’ biggest mistakes is not having their invoicing terms in their contracts.
Even if you discuss rates during the proposal or quoting stage, it is essential to have the terms of your invoices explicitly written in your contract. This is how you ensure prompt payment.
At a minimum, the payment clause in your contract should include:
- – Fee structure (retainer, milestone-based, hourly billing, etc.)
- – Payment terms and schedule
- – Late fees (including late payment penalties, fee amounts, etc.)
- – Deposit policy (if applicable)
- – Refund policy
Having all of this information in writing outlines your expectations, and you have a written agreement as evidence if you need to go to court to collect a payment.
Use an Email with Your Own Domain
An easy way to appear more professional in your invoicing is to use an email address associated with your own domain, rather than a generic Gmail or equivalent.
Even if your domain is connected to a basic one-page website, this simple personal branding element can make your operation appear more professional.
A website hosting service is a great place to start. This technology allows you to register a domain, build your website, and create an email address attached to your domain.
Pro tip: Use an open-source accounting software hosted on your own website hosting service. It’s a smart, secure, and scalable way to manage invoices without relying on third-party platforms. (Tools like Akaunting let you automate payments, track expenses, and maintain a professional image, all from your own domain).
Final Thoughts
How you handle your invoices shapes your clients’ perception of your freelance business. By leveraging bookkeeping software with a built-in invoicing tool, you will appear more professional to your clients and get paid faster.
Are you ready to start invoicing like a pro? Give Akaunting a try. Get started for free.
About the Author

Kelly Moser is the co-founder and editor at Home & Jet, a digital magazine for the modern era. She’s also the content manager at Login Lockdown, covering the latest trends in tech, business and security. Kelly is an expert in freelance writing and content marketing for SaaS, Fintech, and ecommerce startups.